Table of Contents
Showcase Applications: Video Editor
Author
Date
Book a call
🧠 Introducing GeekEdit
GeekEdit is a web-based platform that offers a variety of tools for editing and recording video plus audio files. It does not require installation and is browser-based. It is also intuitive enough that anyone can learn it and get started within a few minutes. In the end, I have also added an easy-to-understand website tour as a guide.
Previously…
…heavy-duty video editing programs aimed to create high-quality videos or movies, not social media material. Most editors were also large and heavy and would require expensive high-end hardware. This meant you would have to spend considerable time and energy learning it before using the application.
With this tool…
…you can take multiple shorts without redoing the entire recording. Traditional software does have advanced and considerably more editing options, but it takes a lot of time to find and remember where everything is. So, suppose you are not a full-time professional editor and want to record or edit a video quickly (trim, speed up, split, merge, and colour correct). GeekEdit is perfect for you.
🤔 How Can You Use it?
There are two main functionalities:
1️⃣ Recording the audio or video
2️⃣ Editing/Modifying the audio or video.
Note: You can also use either of those features as a stand-alone application, i.e., you don’t compulsorily have to edit a video. You can record a clip and export it.
Similarly, if you want to edit a pre-existing video, you can use just the editor part of the application.
⏺️ Recorder:
The Recorder part of the application has three main functionalities :
- Audio or video recording
- Ability to apply virtual background
- Screen recording
Let’s break down one by one how each of these things works.
How does any recorder work:
For any recorder to work, you fundamentally require two things.
- Input: You need an input signal to record.
- Storage: You need a way to store that input signal.
Input:
So for the recorder, let’s take the video input from the webcam and audio input from the system’s microphone.
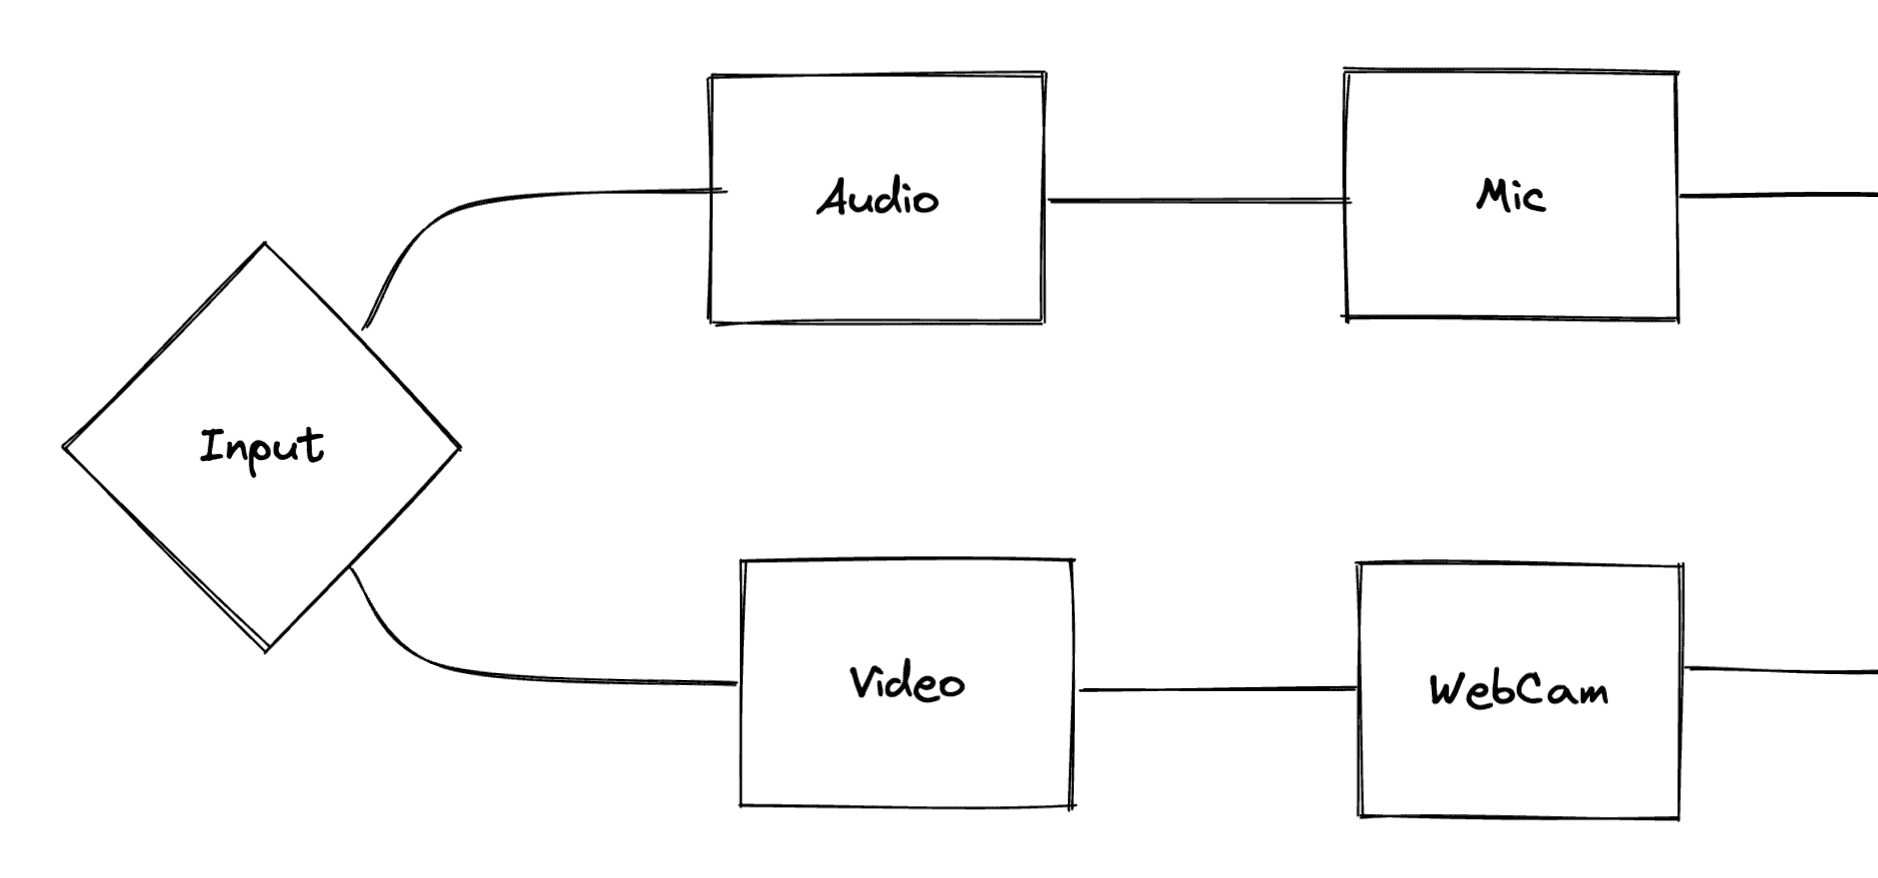
We use a Navigator API to access the system’s webcam and microphone. Navigator provides information about the web browser and its capabilities.
MDN web docs say:
💡 The Navigator interface represents the state and the identity of the user agent. It allows scripts to query and register themselves to carry out some activities.
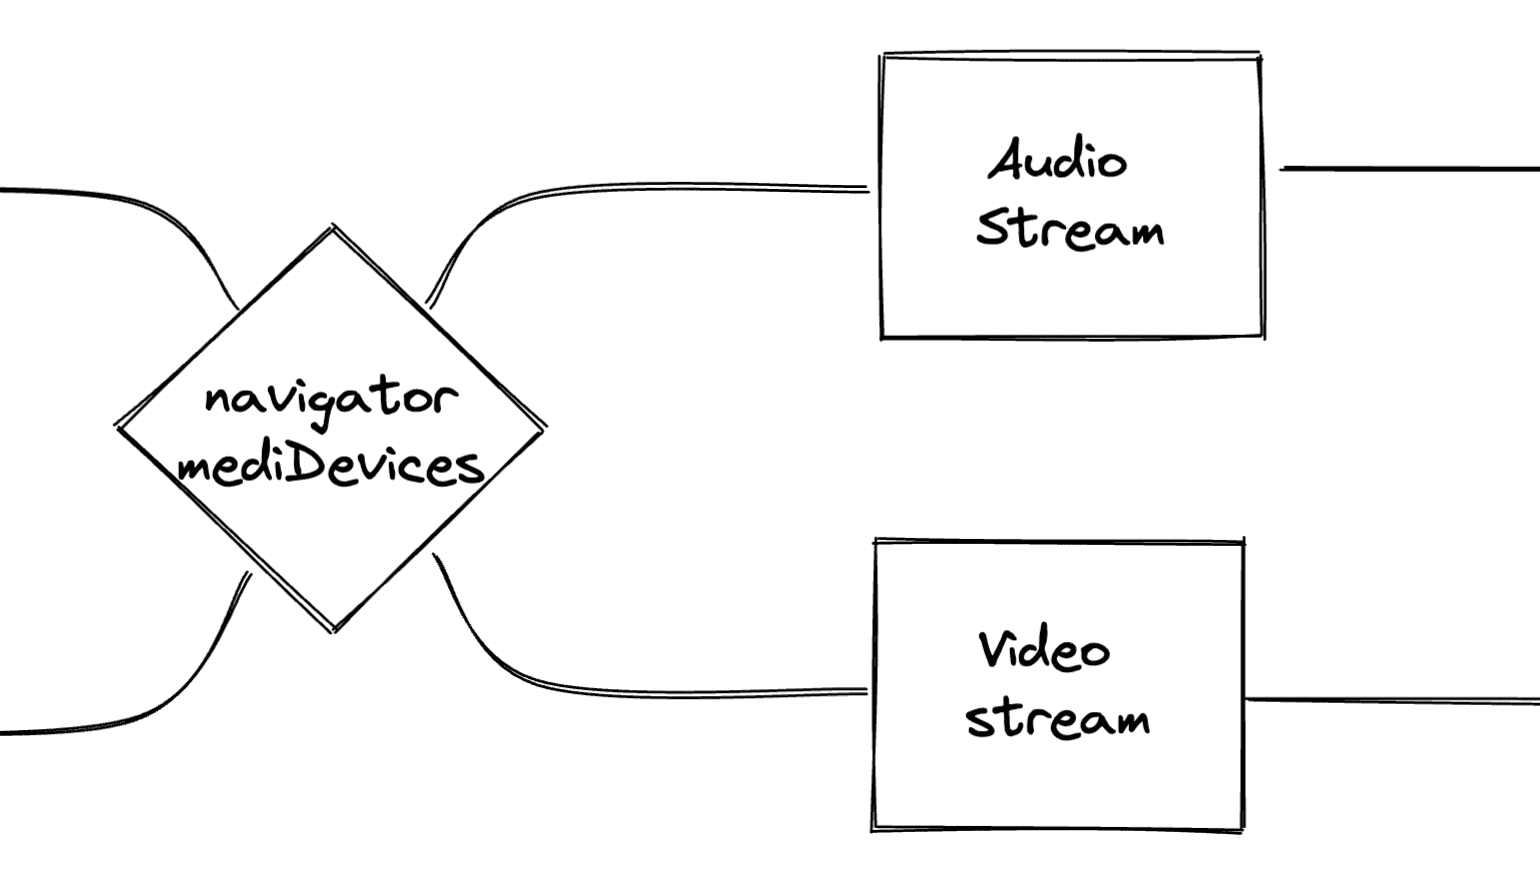
To provide access to the camera and microphone, Navigator exposes MediaDevices objects.
MDN web doc says:
The
Navigator.mediaDevicesread-only property returns aMediaDevicesobject, which provides access to connected media input devices like cameras and microphones.
On the MediaDevices object, the getUserMedia() method prompts the user for permission to use a media input that produces a MediaStream with a track containing the requested media types. This stream can have a video track, audio track and more. If the user provides permission to access the media, then from getUserMedia(), you can get a stream of audio and/or video data.
You can get both audio and video tracks in a single stream, but you can choose to do both in separate streams because you might want to add a virtual background while recording.
Let's use Google's MediaPipe/Selfie Segmentation package to add a virtual background. And pass the image obtained from the video stream to the Selfie Segmentation Package.
How does Selfie Segmentation work?
It takes an image as an input and generates a segmentation mask; basically, it generates a masked image, masking off all backgrounds and leaving a space for the foreground subject. You can apply this mask to the image and remove the background ( isolate the foreground ).
To apply the virtual background, you can alter/process the masked-off part of the image. The new image ( with virtual background ) is drawn on the canvas.
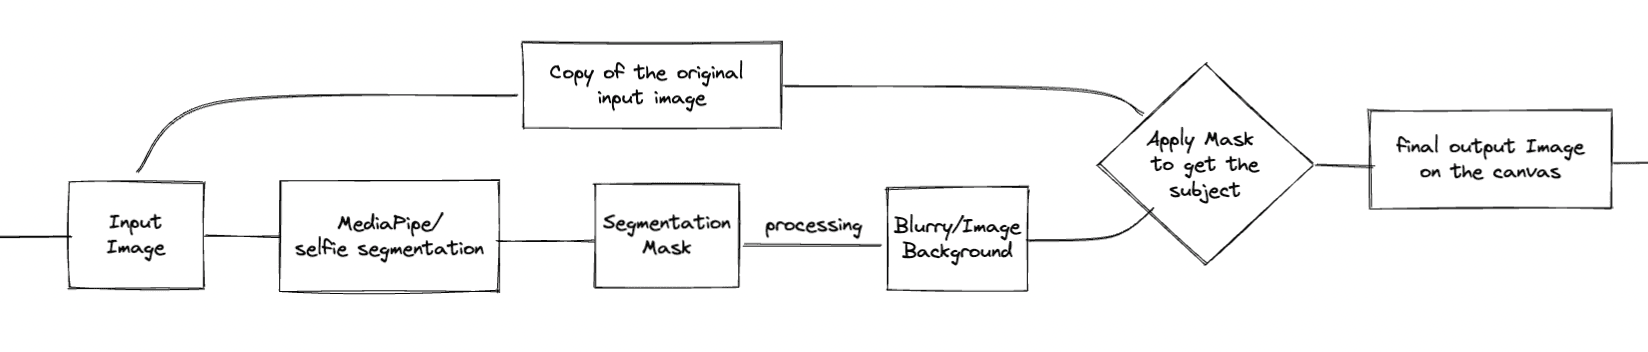
Applying the virtual background is fast, so fast that you can update the canvas in real-time. This provides us with our new video (with Virtual Background) continuously drawn on the canvas. Then you can call the .captureStream() method on this canvas to get the final video stream.
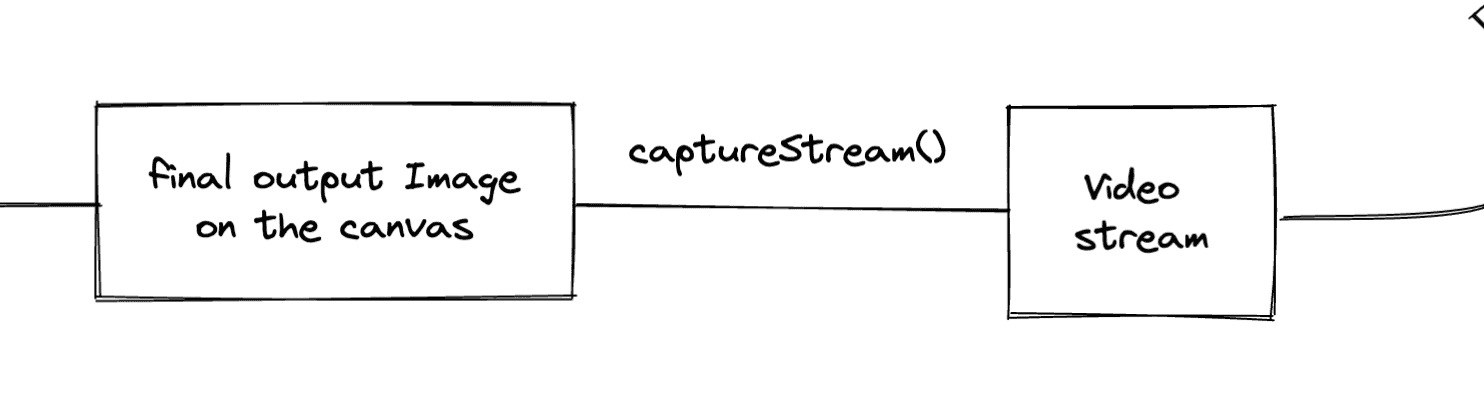
And now you have both audio stream and video stream.
Storage:
Now you have input streams for both audio and video, and you want to record it. To record the streams, you can use MediaStream Recording API (yeah, it’s called that, and it’s that simple).
The MediaStream Recording API makes it possible to capture the data generated by a MediaStream or HTMLMediaElement object for analysis, processing or saving to disk, and it’s surprisingly easy to work with.
The MediaStream Recording API is comprised of a single major interface, MediaRecorder, which does all the work of taking the data from a MediaStream and delivering it to you for processing.
Before starting the recording, you have to combine the two separate streams (audio and video) into a single stream. Create a new MediaStream with the essential tracks from both streams. And now you can pass this stream to the MediaRecorder.
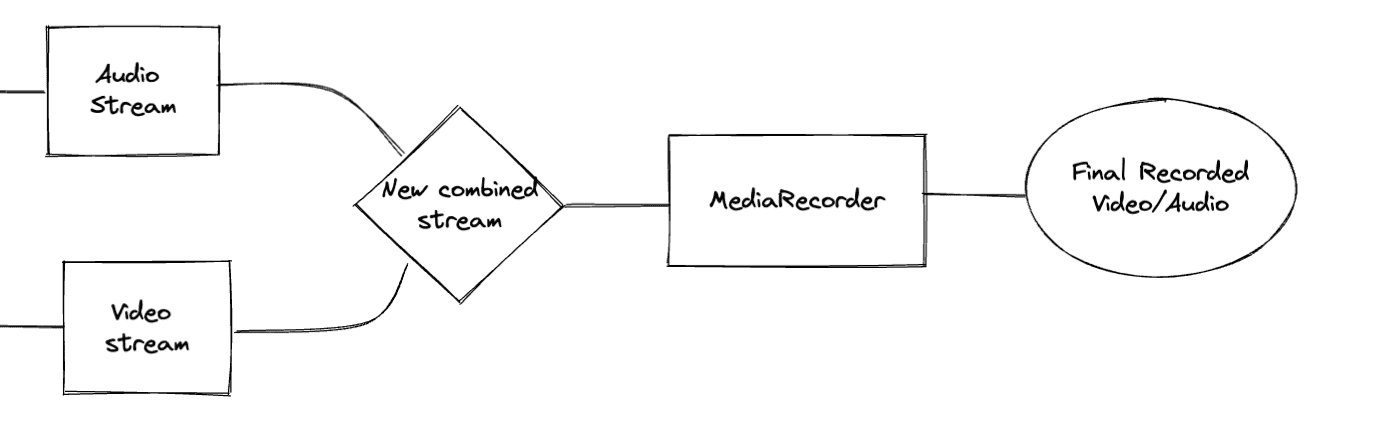
And now you have your Final Recorded Video.
Screen Recording:
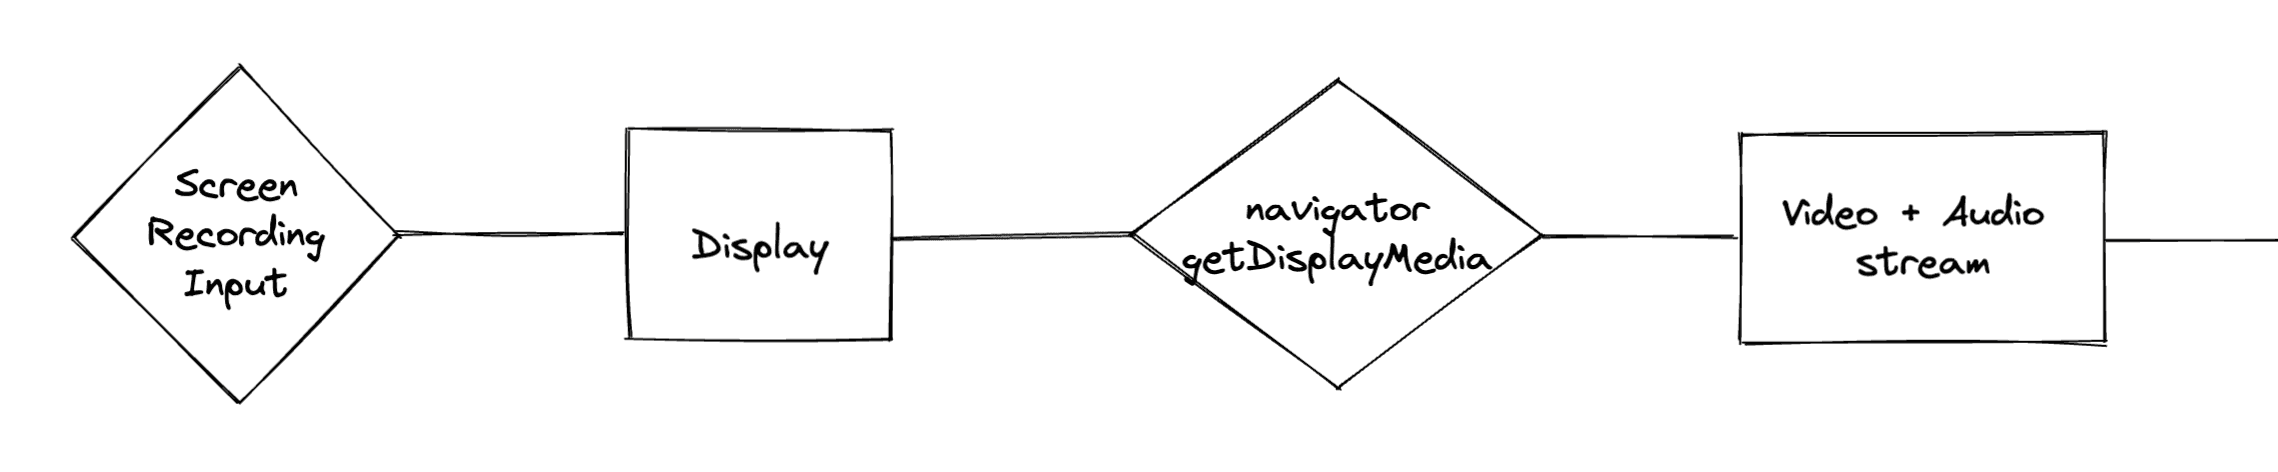
Screen Recording is also done similarly with few differences. The input source for the Screen Recording is a display screen; it can be a single browser tab, a window or an entire desktop screen. To get a MediaStream from a display, you can call upon the Navigator object's getDisplayMedia()method.
💡 The MediaDevices interface's getDisplayMedia() method prompts the user to select and grant permission to capture the contents of a display or portion thereof (such as a window) as a MediaStream
Here you can get both audio and video track in a single stream, as you don't need to alter either of those in any way before recording.
Since the input is a MediaStream, you can record it with the help of MediaStream Recorder API.

And now you can also have the screen recordings.
Editor:
Now let’s have a look at the Editor part of the application.
For the editor, I made an obvious choice; I decided to work with FFmpeg.
Suppose you are a programmer interested in video editing or constructing video-related tools. In that case, you have probably used or at least heard about FFmpeg command line tools.
FFMPEG stands for Fast Forward Moving Picture Experts Group. It is a free, open-source software project offering many videos and audio processing tools. FFmpeg was primarily written in C language, but thanks to the magic of Web Assembly, now you have FFmpeg.wasm. This enables us to use FFmpeg in a JavaScript environment.
💡 WebAssembly is a new type of code that can be run in modern web browsers — it is a low-level assembly-like language with a compact binary format that runs with near-native performance and provides languages such as C/C++, C# and Rust with a compilation target so that they can run on the web.
FFmpeg is a command line tool, i.e. it does not have a GUI; it takes commands from a user in the form of text and then renders the final video. So I needed to build a frontend GUI layer that allows users to define how they edit the videos. Now FFmpeg is a fast tool, but generating a final output video takes a considerable amount of time. So developing a new video for every small change made in the UI layer is not viable.
GUI Layer:
Let’s build the frontend layer to allow users to preview what they have edited before they hit the final render. So here I created a second video editor; this renders a preview of the front end.
You don’t need to generate a new video to render a preview. You can keep track of the changes made to each video file and emulate them on our preview display. This is quite simple.
For example, let's see how Trim functionality works:

Let’s suppose you want a small part of a long video, say from 2 sec to 15 sec. To emulate this trim,— at the click of the play a button — you can start playing the video from the 2-sec mark and (you have to keep track of time) pause the video when it reaches the 15-sec mark, i.e. video has played through its desired length. Doing this is simple with the HTMLVideoElement API; you can programmatically set the current time of the video with an (aptly named) .currentTime property and can play and pause the video with .play() and .pause() functions, respectively.
Let’s have a look at one more functionality. This time let’s take a look at how Merge functionality works:

Here I have two videos, Video 1 and 2, and I want to merge them. Merging means that these videos will play one after another. As soon as Video 1 is done playing, Video 2 will start. To do this, when the seek reaches the 2-sec mark, you can begin playing Video 1; at the 15-sec mark, let’s pause Video 1, switch it out for Video 2 and then start playing the second video. Then play until the 30-sec mark is reached, at which point I will stop Video 2. Playing and stopping the videos can be performed by their respective .play() and .pause() methods. And as for switching the video, it can be done in many ways; for example, you can use the replaceChild() method on the browser DOM, or you can render the videos conditionally.
In similar manner rest of the operations can emulate the preview. When a user is done editing, you can generate the set of instructions based on the user's actions and then pass the original videos with this instruction to FFmpeg. Then follow these instructions, FFmpeg can render the final output video, which is then made available to the user for download.
Front-end editor is an exercise in keeping track of time and deciding which video and what part of it should be playing right now.
The general flow of the application:
- Users need to select the video(s) for editing.
- Users can record the video.
- You can upload the video from the system.
- The user performs all the necessary editing on the GUI layer.
- A set of instructions is generated from user actions for all the edits that the user did.
- This instruction set is passed to the FFmpeg tool with the original video file and renders a final video based on this information.
- Final Edited Video is available to the user from the download.
📽️ The Final Curtain
In the end, you will have two editors, one renders the final output video using the FFmpeg tool, and another emulates how the final output will look on the frontend UI layer. The biggest challenge was keeping everything in sync and ensuring the preview accurately simulated the final production.
I am constantly adding new features, improving performance, and expanding on what can be done with a web-based video editor. If you made it this far, thank you for sticking with us through this little breakdown of how this tool works.
I hope this gave you some insights into how the app works and how I have been aiming to improve it in the upcoming years.
Dive deep into our research and insights. In our articles and blogs, we explore topics on design, how it relates to development, and impact of various trends to businesses.